Saturday, November 29, 2014

Coloring On Vellum Tutorial

This is post today at Classy Cards 'n Such

Hello,
Diane here with you today and I thought I would share with you a very
fun technique and small tutorial on coloring on vellum.

If you are intimidated by coloring or think you can't color,
this is a perfect technique for you to try.  Even if you are good at coloring,
still give it a try as it is so much fun and very rewarding!


 First you will need to gather up some very basic supplies.


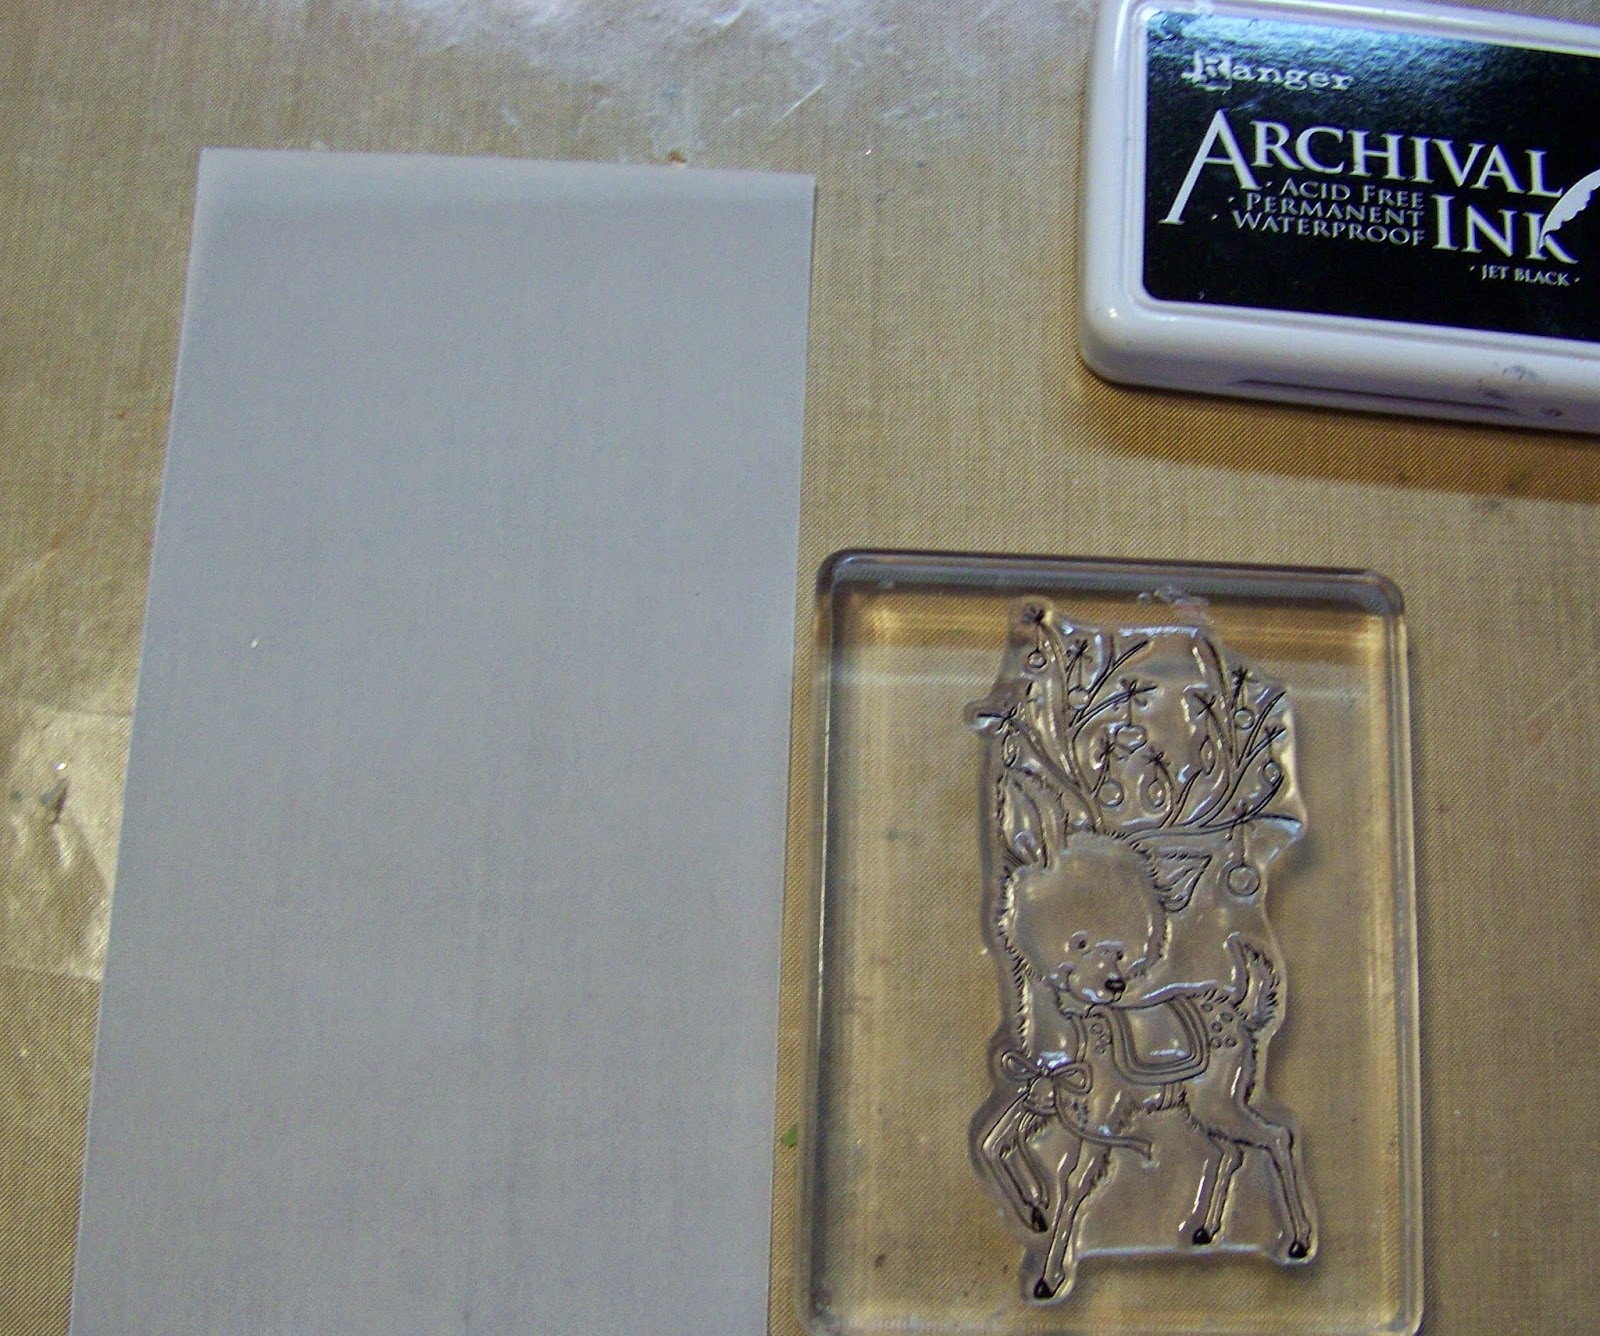
Vellum, any weight works, I have used both the heavier (which is what I am using today)
and the lighter weight.
Ranger Archival Black Ink (this one won't smear on the vellum once it is heat set)
Heat Gun
Permanent Markers (alcohol markers will smear) 

A hint before starting, if you want your image to be on a label/die cut like mine is,
you would want to die cut your shape first, THEN stamp your image, to
eliminate any smearing of colors.

Stamp your image, I am using Wild Rose Studio Reindeer With Baubles


Cover with clear embossing powder.


Pour off excess and heat set with your heat gun.
 
   Here is a photo of before heat setting


and a photo of after heat setting. Can you see the nice "raised edge"?


Flip your image over and begin coloring on the BACKSIDE of your vellum.


If you color a little bit at a time you can blend the colors quickly before they dry.


Once satisfied with your coloring, let dry a bit.

Doesn't look so great at this point does it?
  But just wait and you will amazed at how pretty it is!!


Flip it back over, in this image I added a few "details" on the front side,
such as the white for the spots, gold glitter pen for the bell, and 
Gelly Roll Stardust Clear Pen for the ornament hangers.


Now doesn't it just look wonderful


I finished off my card with papers from BoBunny Candy Cane Lane Collection.
I added a few trees cut with Impression Obsession Fir Trees.
The vellum piece was adhered down in only two places 
with very, very tiny pieces of Scor-Tape 1/8".

I hope this tutorial inspires you to give this technique a try!

Entering the following challenges:
Fantasy Stampers .... Cute Christmas (Stamp used is WRS Reindeer With Baubles)
and
Send A Smile For Kids .... Anything Goes
and
Completely Christmas .... Anything Goes /Twist/ beginning with an "S" (STAR)
and
Fairy Tale Challenge .... Christmas With An Animal


Friday, November 28, 2014

Dear Santa

I know you all are probably out "black Friday" shopping....
but not me, I gave it up several years ago....
I found I spent way too much on things I really didn't intend to buy
but bought it just because it was a good deal!!
With 23 kiddos to buy for, I have to really think it all through now..
BUT hurry and YOU can shop the Black Friday -Monday Cyber sale at
Crafty Secrets...30% off...it ends 12/01 at 12 PM PST....
what are you waiting for...hurry on over and save!!

So that brings us to my project for Crafty Secrets this week!


If you have been visiting my blog, you might have noticed I have
been having a ball with coloring on vellum.
In fact if you come back on Saturday, I will have a little tutorial on it!!

 This one was a sort of "test" for me as I printed the gorgeous 
on heavyweight vellum on my printer to see if I could get the same results
as stamping on the vellum.

I think it reacted almost the same way, but I had to literally "run" from my
printer to my work area to "dump" the clear EB powder on before the printer ink dried!

I colored with SU markers Cherry Cobbler for Santa's suit, Real Red for his stocking
Blush Blossom for his skin tones and Always Artichoke for the holly.

The idea of coloring on the backside of Vellum, is to achieve a soft not so bright color
which is perfect for these vintage images.


I kept this card pretty simple as I really wanted all the focus on the Santa image,
I LOVE how his stocking hangs out of the image...just gives it a 3D look.
I did  punch some snowflakes and coated them with glitter for some "sparkle"!!

There are several NEW digital stamp sets in the Crafty Secrets online store


Don't forget that Dec 1st is our "Crafty Secrets December linky party"....
this is where all the Design Team members get together with a tutorial 
each using Crafty Secrets products.....
It also means we have a challenge for your to join in and everyone that enters
is a winner!!!!

Entering the following challenges:
Word Art Wednesday .... Anything Goes
and
Scrapy Land .... Add Texture (embossing folder)
and
Winter Wonderland .... Dies/Punches
and
4 Crafty chicks ....Die Cuts
and
Creative Knockouts .... All That Glitters
and
DL.Art  .... Any Winter Holiday
and 
Time Out .... Embossing With a Bit of Sparkle

Thursday, November 27, 2014

Happy Thanksgiving!!!


Happy Thanksgiving All!!!

We will be having dinner at my daughter's with all the trimmings!!
It feels really strange not to have my turkey in the oven and smelling that
wonderful roasting !!
I made butternut squash as I have to have it, 
it is a favorite of mine.
I also made cranberry sauce, I put oranges in mine.
I was to take my traditional German Chocolate pie
but when I got the recipe out to get the ingredients, I have misplaced it!
I spent about an hour on the internet and could not find that pie  recipe anywhere..
And of all things the Bakers Chocolate site was down!!

I want to wish you all a safe and enjoyable day with family and friends
and to thank you for visiting my blog and taking the time to leave me
wonderful comments!!!
I appreciate you all
and will be back tomorrow with a vintage Santa!!


Wednesday, November 26, 2014

Shiney Bright

This is my post today on the Classy Cards 'n Such blog.

Hello,
Diane here with you today with my creation for our challenge this week which is
Christmas Brights and using the photo below for inspiration!


I usually have the traditional red and green in my house, but sometimes it's fun
to get out of the "norm" and do something different!!


I started out with a much loved, 
but discontinued Stardream Serpentine Pearlized paper as my back ground.
Next, I cut Memory Box Clairmont Ornaments 4 times,
using various colors from the Iris Sampler pack of Shimmer Sheetz.

To finish I cut Spellbinders Divine Elegance label that I stamped
using the JustRite Christmas Inner Thoughts stamp set.

We would love to see your creations in our challenges.
Why not join in with us!!

Entering the following challenges:
Festive Friday .... Inspiration photo below


and
Fab 'n Funky .... Die Cuts
and
A Song In your He{ART} .... Have Yourself A Merry Little Christmas
and
Addicted To Stamps .... Holiday


Santa Claus Is Coming To Town At The Sisterhood

You better watch out
You better not pout
Santa Claus Is Coming To Town at "The Sisterhood"
LOL...do I have your attention now.....
just be glad you can't hear me sing that tune
or you would be running out the door screaming!!

 Our hostess is Terri this week and you just need to make
a project with a Santa on it...easy peasy!!!


I stamped my Bo Bunny Santa image on Vellum using
Ranger Archival Ink and then embossing with clear embossing
powder to set the ink.

Now the fun part begins....
flip your image over and color on the back side....
I just used some SU markers....
once you are done and flip it back over, you have a subtle beautiful color...
Then I made a frame from a "discarded" part of a Spellbinders cut out
and added some Tinsel glitter I have had forever it seems...
I have a  small "tutorial" for this coming on Saturday....
stop back by and take a "peek"!

You can't tell in the photo, but both the sentiment piece and the ivy flourish
are cut from a shimmery pearl paper...so pretty!!

The background paper, which I took forever picking out and then almost
totally covering it up, is from my Christmas scrap bag!!

I added a few gold foil snowflakes to finish!!

I did this technique last year on a tag and loved it...you can see it HERE!!

Now why don't you "POP" on over to The Sisterhood blog and see what my fellow
teamies have made to inspire you  and then join in with us!!

Entering in the following Challenges:
Try It On Tuesday .... Christmas Is Coming
and
City Crafter .... Favorite Technique (coloring on Vellum)
and
Get Creative .... Anything Goes/Optional Glitter
and
Monday Morning Challenge ....Christmas/Winter (m)
and
Sparkles Monthly Challenge .... The Big Guy (Santa)

Saturday, November 22, 2014

Christmas Jingle

This is my post on the
Classy Cards 'n Such  blog today

Hello Classy Friends!
Diane here with you today and I have to admit I am very excited
about this card with some of the new products on it that are
"in store" right now!!


Dreamweaver Stencils have come out with embossing folders.
Wow, these certainly make a very nice deep impression!
The one I am showing today is Christmas Borders.
I told Beverly I had to almost stand on my head, 
just so I could get a good picture of the beautiful embossing!!

Next I used another new item in store,
One of the things I love about Cottage Cutz dies,
is that most of the pieces can be cut separate!
I cut extra pine branches while was I cutting this, for later use!

The pine branch was cut from Stardream Emerald 105# paper
and the jingle bells from Stardream Jupiter Metallic 105# paper.

I did use a Marvy Snow Marker on my pine branch.
Can you see how the snow puffs up??

I stamped a sentiment from JustRite Christmas Inner Thoughts
then added Christmas Red Pearls

Take a peek at the store and see all the NEW items.....
Also, don't forget we have a weekly challenge
with a fabulous prize offered to the winner!!
Why not join in with us??

Entering the following challenges:

Time Out .... Embossing/Twist add Sparkle

Merry Monday .... Christmas Bells

Friday, November 21, 2014

Doily Wreath Tag

If you have been reading my blog the last few days
you might have read that I have been trying to squeeze in
a few of my "favorite" challenges as time allows.
So, I have another challenge I did for today
at Cheery Lynn Designs "Tag You're It".

When I pulled out my storage notebook of CLD dies,
I had something else entirely in mind,
but seeing the Polynesian Sails die that comes with the cutest
little doily tucked inside it, I imagined making a wreath with it!


I used the die shown, cut my little doily and used a 1" punch to
punch the center out, making it into a wreath!


The teeny, tiny "Poinsettias" were cut from red foil using 
CLD "Tiny Flower Kit"...perfect sizes for my wreath!!


I added a heart trim along the bottom using CLD Expandable Tiny Borders.
The paper as well as the banner across my wreath are Lawn Fawn Snowy Day.

I finished by stamping to and from across the bottom (I plan to use this for a gift)
and added the red satin ribbon tie on and bow!!

Entering in the following favorite challenges:
Cheery Lynn Designs .... Tag You're It
and
Tuesday Throwdown .... Christmas Tags
and
Word Art Wednesday ....Anything Goes


Thursday, November 20, 2014

Thanks So Much

Hello there!
I have some favorite challenges I decided to try and fit in each week
when I don't have anything scheduled.

One of my favorite places is Stampendous...
I love their products and being a "month long" challenge
it gives me plenty of opportunity to join in.

 This month the theme is "So Thankful".
I decided on a "thank you" card, 
as this time of the year, I think we can all use those ..right?
Plus the fact I think we all realize we have much to be "thankful" for!!


Some of my favorite stamps Stampendous has are the background stamps!
Being an avid gardener and all, this stamp spoke volumes to me.
it is the  Seed Background stamp. 
I love it so much I decided to make it the focal point on my card!

I started out with a small 4 x 4 garden green card stock
and  in keeping with the color, stamped garden green ink on a scrap of watercolor paper
giving it a bit more texture!!

I added a ribbon bow with my "thanks so much" sentiment...
and then decided it needed a bit more, 
so I cut a tiny leaf and added sequins for a bit of interest!

I put the card aside and jumped in the shower (a bit too much info..eh...lol)
but while in there I decided it needed a matching envelope
(my best ideas come in the shower...lol)
So I grabbed my envelope punch board and made a quick and pretty matching envie!


It fits in perfect...bow and all!!


Entering in the following favorite challenges:
Stampendous .... So Thankful"
and
Simon Says Wednesday Challenge .... Thanks/Thankful
and
The Paper Players .... Clean and Simple Thank You


Blooming Ornament

This is my post for our newest challenge this week at
Why don't you join in!!
LOOK what you could win this week
PoppyStamps small blooming poinsettia DIE!!

Want to save a bit on some crafty supplies??
Just head on over to the Classy Cards 'n Such store
 and use coupon code DIANE-10 to 10% off your entire order!

Hi Classy Friends!!
Diane here with you today on the Classy Cards 'n Such blog.

Our challenge this week is all about Christmas Blooms.
Using the inspiration photo below.


You can get very creative with this one by
using Poinsettias, Wreaths, Pine Cones, Greens, etc!
Doesn't it sound like fun?
Well, I have to say it was!
I had so much fun putting this card together using some wonderful products
from the Classy Cards 'n Such store!


I decided to make a shaped card and first started with just plain white card stock.
Scoring it and folding it half, then offsetting the die at the top so it
would not cut all the way through, allowing my card to open and shut.

I used the largest of the Spellbinders 2011 Heirloom Ornaments die to achieve this.
Using the same die, I cut out another full size ornament from 
Pearlized Esse White Metallic paper and added it to the front of my card.

To decorate my ornament I cut a Memory Box Plush Poinsettia Corner twice.
One from the red, and one from the green Foil Paper Textured  assortment.
I glued each Poinsettia petal down using Art Institute Clear Adhesive .

To finish I added White Pearls and a shimmery bow.
I also completed the inside of my card with a sentiment from 


I hope you enjoyed my card and I invite you to join in our weekly challenge.
You can always find our current challenge 
by clicking on the challenge tab on the right side of the blog!

Entering the following favorite challenges:
Scrapbooker PhD ....Shaped cards
and
Love To Create .... Make It For Christmas
and 
613 Avenue Create .... Anything Goes
and 
Word Art Wednesday .... Anything Goes

Wednesday, November 19, 2014

Dies R Us Give Away

Hello everyone...
It's a Celebration!!
Celebrating 1000 likes on Facebook

take a peek at the Dies R Us Give Away below
and be sure to follow the rules to enter
you could win one of the 3 gift vouchers for dies of your choice.....
here is a link to the Facebook page
and a link to the Event
Comments left here on my blog don't count!!


Sugar and Spice

Do you like to make tags??
It is one of my very favorite things to do....
each one is always so unique and different....
and you can use up some of those scraps too, that you have laying around!.

However, my post today is not about using scraps,
It's using some of my wonderful new digitals from Crafty Secrets
to make these tags!!

Each year, my sister, my daughter, my niece, and my Mom
have a "countdown" to Christmas, where four of us
buy each other 8 gifts, so you end up with 24 gifts a piece
and open one a day starting December 1st.
Sound like fun....oh yes it is....
we include my Mom, but we don't make her shop...lol

So I (we) get really creative with our packages, and one thing is our fancy tags!!
That is where my new Crafty Secrets digitals came into play.
I LOVE these new kitchen sets!!!!

these two kits are packed FULL of awesome kitchen digitals.
I have to tell you, I have nothing fancy to print my digitals with...
I use my printer photo program and/or Microsoft Word.
So give this a try, it opens up a whole new world of creating!!


I started my tags out with printing the digital papers in a 5 x 7 size
and cutting them to fit my bigger manila tags.
I added other bits and pieces, like those adorable little girls....
I just shrunk them down a bit for a perfect size for my tags.....
aren't they so darn cute!!!!


ALL of the paper items you see used on these two tags are from

The other items are things from my stash,
including the snowflake buttons, tinsel and those candy canes, 
which I have had for at least 10 years!!

Take a peek at the Crafty Secrets online store 
and stop by the Crafty Secrets blog, too
There is always amazing inspiration going on there !!!

Entering the following challenges:
Clear It Out .... Anything Goes
and
Tuesday Throwdown .... Christmas Tags
and
Craft-Dee BowZ .... Anything Goes with a Bow
and
Craftin Desert Diva's ....Linky Party "Tags"
and
The Pink Elephant .... Anything But A Card
and
Sentimental Sundays .... Brads, Buttons and/or Bows plus sentiment
and
Word Art Wednesday .... Anything Goes
and
V's Sweet Ideas .... Anything Goes


Tuesday, November 18, 2014

Thanksgiving Wishes and A Bunch of Snow

Hello...I have to tell you we got dumped on in snow overnight....
Inches and inches and counting, it is still coming down...but oh so pretty...
All our area schools are closed due to the road conditions and blowing snow.
Funny thing is, it is to be 50 degrees here on Sunday!!
My daughter has a foreign exchange student staying the school year from China.
He has never seen snow before, so I wonder what his reaction will be...LOL!!

Here are a few photos I took early this am.


Now onto the card I made purposely  for the challenge at Impression Obsession
"Thanksgiving Wishes"


I went with more of a fall theme.....
inside I will write "Happy Thanksgiving" to the recipient!!
To me Thanksgiving and Fall are one and the same....
Turkey and the crisp Autumn air (tell that to Mother Nature, will you)!!!
Plus the fact I don't have any Thanksgiving stamps...so am making due...LOL!!

I splattered ink first, then stamped an Impression Obsession verse
from CL 135 Autumn Leaves.
I cut the Impression Obsession Bird on A Branch DIE161-N
twice, so I could get a different look for my bird.
I finished it off with a prety bow, button and twine!!


My poor birds here are looking for food, and I feel bad, as I have none.
This snowstorm is early for us, and as usual I am not prepared!!

Entering in the following challenges:
Impression Obsession .... Thanksgiving Wishes
and
Melonheadz Friends ..... Add A Sentiment
and
Craft Dee BowZ ....Anything Goes With A Bow
and
Stamp and Create .... Ribbons and/or Bows
and
Runway Inspired .....Photo Inspiration